Adding an Enemy in an Isometric World

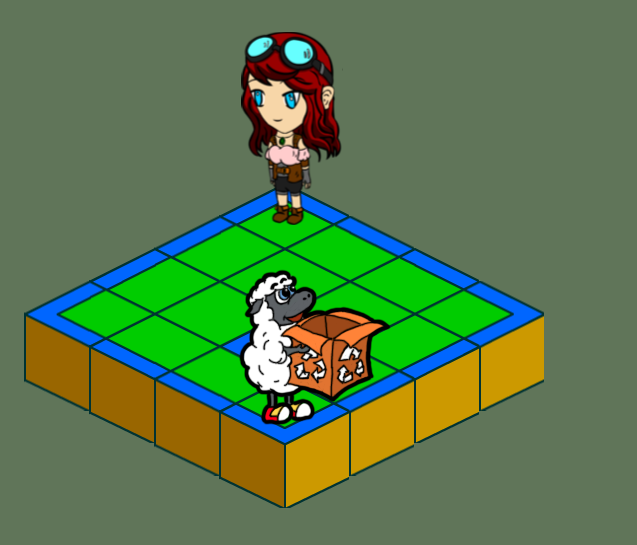
We have created an isometric world and a character that moves around in the world.  But let’s say we want to add things in the world that the character can interact with.  There may be an enemy on another tile, for example, and when the character encounters this enemy, the game would switch from a “map mode” (which is where we left off in my previous post) to a “battle mode” where the character must fight the enemy.

Uh oh! It's that sheep again!

Uh oh! It’s that sheep again!

So let’s add an enemy model:

var EnemyModel = Backbone.Model.extend({
   defaults: {
      x : 0,
      y : 0,
      row : 0,
      column : 0,
      destX : 0,
      destY : 0,
      destRow : 0,
      destColumn : 0
   }
});

And let’s add the enemy on tile (3,3) by editing MapView:

/**
 * Load enemy
 */
loadEnemy : function(context) {
   var img = new Image(),
   originTile = context.tileMap[3][3];
   img.src = 'img/enemy.png';
   $(img).load(function() {
      // create spritesheet and assign the associated data.
      var spriteSheet = new createjs.SpriteSheet({
         //image to use
         images: [img],
         //width, height & registration point of each sprite
        frames: { width: 152, height: 156, regX: 0, regY: 0 }
      });
      context.enemy = new createjs.BitmapAnimation(spriteSheet);
      context.enemy.x = originTile.get('x');
      context.enemy.y = originTile.get('y');
      context.enemyModel = new EnemyModel({x:context.enemy.x, y:context.enemy.y, row: originTile.get('row'), column: originTile.get('column') });
      context.enemy.regX = 110;
      context.enemy.regY = 174;
      context.enemy.currentFrame = 0;
      context.stage.addChild(context.enemy);
      context.stage.update();
      Main.init();
      context.trigger('EVENT_MAP_LOADED');
   });
}

Notice that it triggers the event “EVENT_MAP_LOADED” at the very end.  I have made loadEnemy be the last thing loaded, after the world and after the player have been loaded, so that the game will be notified that everything in the world have been loaded.  We will go over what happens when this gets triggered later.

Modify movePlayer() in MapView (see code in red):

...
if ( (playerX === destX) && (playerY === destY) ) {
   //console.log('splice');
   context.model.set('movePlayer', false);
   context.playerModel.set('row', destRow);
   context.playerModel.set('column', destColumn);
   context.playerModel.set('x', destX);
   context.playerModel.set('y', destY);
   if (context.path.length > 0) {
      context.path.splice(0,1);
      if (context.path.length > 0) {
         context.movePlayerToTile(context, context.path[0]);
      } else {
         context.model.set('movePlayer', false);
         if ( (context.playerModel.get('destRow') === context.enemyModel.get('row')) && (context.playerModel.get('destColumn') === context.enemyModel.get('column')) ) {
            context.trigger('EVENT_MAP_REACHED_ENEMY');
         }
      }
   } else {
      context.model.set('movePlayer', false);
       if ( (context.playerModel.get('destRow') === context.enemyModel.get('row')) && (context.playerModel.get('destColumn') === context.enemyModel.get('column')) ) {
          context.trigger('EVENT_MAP_REACHED_ENEMY');
       }
   }
}
...

You will notice another event here, “EVENT_MAP_REACHED_ENEMY.”  When the player and enemy are on the same tile, this event will be triggered.  So what happens when this gets triggered, and when the other event, “EVENT_MAP_LOADED” gets triggered?  Let’s go to our main file to find out.  I’ve highlighted those parts in red, as well as some other parts that get affected.

var Main = (function($){
   var mapModel = new MapModel(),
   mapView = new MapView( { model: mapModel } ),
   gameMode = 'MODE_MAP';
   var init = function() {
      mapView.on('EVENT_MAP_LOADED', Main.onLoaded);
      mapView.on('EVENT_MAP_REACHED_ENEMY', Main.onReachedEnemy);
   };
   var onLoaded = function() {
      Main.ticker();
   };
   var onReachedEnemy = function() {
      alert('BAAAAAHTTLE MODE!');
      Main.gameMode = 'MODE_BATTLE';
   };
   var ticker = function() {
      createjs.Ticker.setFPS(40);
      createjs.Ticker.useRAF = true;
      createjs.Ticker.addListener(Main); // look for "tick" function in Main
   };
   var tick = function(dt, paused) {
      switch(gameMode) {
         case 'MODE_MAP':
            if (mapModel.get('movePlayer') === true) {
               mapView.movePlayer(mapView);
            }
            break;
         case 'MODE_BATTLE':
            break;
      }
      mapView.stage.update();
   };
   return {
      gameMode : gameMode,
      init : init,
      onLoaded : onLoaded,
      onReachedEnemy : onReachedEnemy,
      ticker : ticker,
      tick : tick
   };
})(jQuery);

So, on “EVENT_MAP_LOADED,” we start the ticker for the game loop.  “tick()” gets called every frame.  In tick(), we have a switch case with different game modes.  Initially, we are in “MODE_MAP,” which is the mode in which the character travels around in the isometric world.  When the character reaches the enemy’s tile, “EVENT_MAP_REACHED_ENEMY” gets triggered, and we switch to “MODE_BATTLE.”  At this point, the character is not able to move around in the world anymore, and we can switch to a different screen that can perhaps show the character’s hit points, skills, items, etc. for fighting the enemy.  The interactivity at this point can be real-time combat or turn-based or a mixture of both… it’s up to you!

BAAAAAHTTLE MODE!

BAAAAAHTTLE MODE!

Of course, this concept can be followed when adding items to the world (reaching a tile with an item on it could trigger a prompt to pick up the item) or people (reaching a tile with a person on it could trigger dialogue), and we could have different game modes for each of these.

Ideally, we would want to make a state machine to handle the different game modes, and the different modes can be in a data structure, such as a stack.  We could be in MODE_MAP when travelling around the world, and when we reach an enemy, push MODE_BATTLE to the stack, and when done, pop it off.  Eventually, we could have many different modes, such as MODE_INVENTORY to manage your items or MODE_SETTINGS to update your game settings.  But since we are in a “prototype” phase, we can go with this way for now.

Speaking of prototype, I may switch to another framework as I realize more and more of this game’s requirements for its production phase, such as mobile support.  I may write about this more in my future blogs, so stay tuned.
Creating a Character in an Isometric World

In my previous posts, I have written about how to create an isometric world and how to move a character to tiles using pathfinding.  However, the character I used did not have the proper angles for an isometric world.  So today will be somewhat of a more art-focused post on how I created a character for this.  Also, I don’t claim to be an artist, I just doodle really, so any feedback would be greatly appreciated!

I started off with a front-facing character sketch (using pencil and paper) so that I have a basic idea of the design I wanted to go for.  Mainly, my inspirations were anime, chibi, and steampunk:

Image

From there, again in pencil and paper, I sketched the isometric front and back of the character.  I made this version more chibi-like with more defined lines.  That way, when I scan it, it’ll be easier to see and trace:

ImageImage

Then, I scanned the isometric front and back sketches and traced them in Flash.  I chose Flash because I already have the program, and it keeps the image in vector format so that it’s easy to scale up and down without downgrading the image quality.  Some other options for drawing would be Illustrator, Photoshop, Manga Studio, Sketchbook Pro.  Any others?  Also, I used a really old and small Wacom Graphire4 tablet.  Another option would be a Cintiq.  Or a mouse.  Hehe.Image

As you can see in the screenshot above, I tried to separate the different body parts and clothing into different layers.  This makes it easier to make changes later.

Image

I didn’t trace it exactly.  I wanted to shorten her legs a little.  If you want to make some changes in your design, now’s a great time to do so.  Again, separating the body parts into different layers makes this process much easier, especially if you make mistakes and end up erasing a lot.  I also made separate layers for the colors.  So underneath the “hair” ink layer, I had a “hair color” layer, and so on.  I think it’s also important to label the layers and folders for organizational purposes, and it’ll be easier to remember what you did when you go back to it later on.

Image

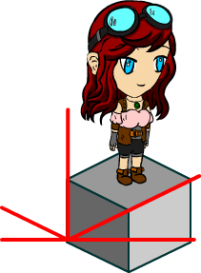
Also make sure that you match it up with the tile you’re using!

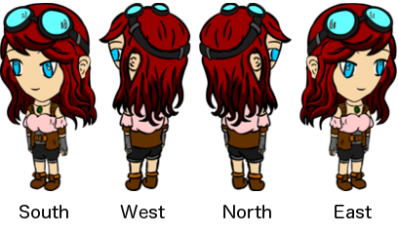
I am using only four directions in my pathfinding, so I only needed to ink and color the front and back to make the first two directions, and then do a “Modify – Transform – Flip Vertical” to do the last two directions, since they are really mirrors of each other.

Image

The above image would make a great spritesheet (without the directions text of course), and the character dimensions were about 102×195 each.  Using EaselJS, I applied this into the spritesheet settings in the code.  My loadPlayer() code looks something like this:

// create spritesheet and assign the associated data.
var spriteSheet = new createjs.SpriteSheet({
  //image to use
  images: [img],
  //width, height & registration point of each sprite
  frames: { width: 102, height: 195, regX: 32.5, regY: 16.25 }
});

You would then need to associate the four character frames with the four directions.  For example, if the character is moving to a higher row (like from row 0 to row 2), but remains in the same column, she is moving south.  In the spritesheet, it’s the first image, so it’s frame 0.

if ( row < destRow && column === destColumn ) {
  context.player.currentFrame = 0;  // south
} else if ( row > destRow && column === destColumn ) {
  context.player.currentFrame = 2;  // west
} else if ( row === destRow && column < destColumn ) {
  context.player.currentFrame = 3;  // north
} else if ( row === destRow && column > destColumn ) {
  context.player.currentFrame = 1;  // east
}

To view the working example, check it out here!

Pathfinding in Isometric View (Part 2)

This is an expansion of my previous blog, Pathfinding in Isometric View.

If you followed my code exactly, you will notice that the character will have a “zig zag” movement on the isometric map.  It will move somewhat diagonally along the path, but then take a few more steps in the “x” coordinate.  Note these lines from the movePlayer() function:

if (playerX < destX) {
  context.player.x += 0.5;
} else if (playerX > destX) {
  context.player.x -= 0.5;
} else {
  context.player.x = destX;
}
if (playerY < destY) {
  context.player.y += 0.5;
} else if (playerY > destY) {
  context.player.y -= 0.5;
} else {
  context.player.y = destY;
}

In my other previous blog, Creating an Isometric World with EaselJS, I mentioned about how an isometric tile’s height is half its width.  Therefore, make sure your “y” amount is half of the “x” amount.  In my example, the amounts were equal.  Let’s modify the “x” amount a bit:

if (playerX < destX) {
  context.player.x += 1;
} else if (playerX > destX) {
  context.player.x -= 1;
} else {
  context.player.x = destX;
}
if (playerY < destY) {
  context.player.y += 0.5;
} else if (playerY > destY) {
  context.player.y -= 0.5;
} else {
  context.player.y = destY;
}

Ah, much better!

Another slight modification would be in the click event.  If you’ve noticed, you can only click on a tile once to move the character.  If you click a second tile to move the character to it, this line in movePlayerToTile():

var row = array[0],

gives you this error:

Uncaught TypeError: Cannot read property '0' of undefined

One reason is because I didn’t set the new “row” and “column” in the PlayerModel in the movePlayer() function:

...
if ( (playerX === destX) && (playerY === destY) ) {
 context.model.set('movePlayer', false);
 context.playerModel.set('row', context.playerModel.get('destRow'));
 context.playerModel.set('column', context.playerModel.get('destColumn'));
 context.playerModel.set('x', destX);
 context.playerModel.set('y', destY);
...

This basically resets the origin of the path, since you’re not on (0,0) anymore.

The other reason is because the pathfinding library I am using (Pathfinding.js) has a grid that isn’t reusable, so I have to clone it before calling its findPath API.  So instead of this in my createPath() function:

var path = context.finder.findPath(playerRow, playerColumn, destinationRow, destinationColumn, grid);

simply clone the grid:

var gridClone = grid.clone(),
    path = context.finder.findPath(playerRow, playerColumn, destinationRow, destinationColumn, gridClone);

And that should do it!

In case you’re wondering, I’ve been using my sheep character for the isometric world.  However, he doesn’t have the proper angles of a character in an isometric world.  He doesn’t have any animations, either.  So stay tuned for a future post on how to create a character in an isometric world!

Baaaa!

Baaaa!

Pathfinding in Isometric View

A few weeks ago, I blogged about creating an isometric world in EaselJS.  This is a continuation of that post and will be focusing on pathfinding.  Pathfinding deals with finding the shortest route between tile A and tile B, which we will need if we want to move our player around in the world.

1. Tile Model

In my isometric world post, we left off with rows and columns of tiles that became our grid or our tile map.  Ideally, we will need to store information about each tile.  Information such as, what is its x?  Its y?  Its row?  Its column?  This will become important when we use pathfinding and figuring out the tiles that the player must visit until reaching the destination tile.  All of this information about a tile can be stored in a Tile Model.  Since we’re using Backbone, we can create a model easily:

var TileModel = Backbone.Model.extend({
  defaults: {
    column : 0,
    row : 0,
    x : 0,
    y : 0
  }
});

Then, let’s modify our “for loops” where we set up the rows and columns of our tiles.  We need to somehow associate a given tile with a Tile Model:

createTileMap : function(context, img, x, y, regX, regY, data) {
   var tile,
       bmp,
       i,
       j;
   context.tileMap = [];
   for (i = 0; i < 4; i++) {
     context.tileMap[i] = [];
     for (j = 0; j < 4; j++) {
       bmp = new createjs.BitmapAnimation(img);
       bmp.x = (j-i) * x;
       bmp.y = (i+j) * y;
       bmp.regX = regX;
       bmp.regY = regY;
       bmp.row = i; // add row property
       bmp.column = j; // add column property
       bmp.currentFrame = data[i][j];
       context.stage.addChild(bmp);
       tile = new TileModel({column:i, row:j, x:bmp.x, y:bmp.y, img:bmp});
       context.tileMap[i][j] = tile;
     }
  }
}

2. The Player

Next, we’ll need a player in our isometric world.  Add this to the bottom of your createTileMap() function, so that once the tile map is ready, you can load the player:

context.loadPlayer(context);

Then create a loadPlayer() function like this (replace “image”, “width”, “height”, “regX”, and “regY” below with your player’s image and dimensions):

loadPlayer : function(context) {
  var img = new Image(),
  originTile = context.tileMap[0][0];
  img.src = '[image]';
  $(img).load(function() {
    // create spritesheet and assign the associated data.
    var spriteSheet = new createjs.SpriteSheet({
      // image to use
      images: [img],
      // width, height & registration point of each sprite
     frames: { width: [width], height: [height], regX: 0, regY: 0 }
  });
  context.player = new createjs.BitmapAnimation(spriteSheet);
  context.player.x = originTile.get('x');
  context.player.y = originTile.get('y');
  context.playerModel = new PlayerModel({x:context.player.x, y:context.player.y, row: originTile.get('row'), column: originTile.get('column') });
  context.player.regX = [regX];
  context.player.regY = [regY];
  context.player.currentFrame = 0;
  context.stage.addChild(context.player);
  context.stage.update();
  });
 }

3. Pathfinding Algorithm

Then, we’ll need a pathfinding algorithm.  I used A* and used a library called Pathfinding.js, which has other pathfinding algorithm choices as well.  First, for Pathfinding.js, we will need to set up a few things:

  • The grid (4×4):
this.grid = new PF.Grid(4,4);
  • Set the unwalkable tile (all tiles are walkable by default).  In our example, the unwalkable tile was in (2,2):
this.grid.setWalkableAt(2,2,false);
  • Create a new instance of the A* finder:
this.finder = new PF.AStarFinder();

All of the above 3 lines can be part of your “initialize()” method, which comes as part of your View.

In this example, we can have the user’s mouse click determine the “destination tile.”

bmp.onClick = function(event) {
   context.path = context.createPath(context, context.playerModel.get('row'), context.playerModel.get('column'), event.target.row, event.target.column, context.grid);
}

Then define a “createPath()” method that uses the A* finder method:

createPath : function(context, playerRow, playerColumn, destinationRow, destinationColumn, grid) {
  context.path = context.finder.findPath(playerRow, playerColumn, destinationRow, destinationColumn, grid);
  context.movePlayerToTile(context, context.path[0]);
  return context.path;
}

When you do a console.log on the context.path result, you will notice that you get an array of [row,column]’s that list out the tiles that the player must visit until reaching the destination tile.  So if your player starts at [0,0], and you clicked on tile [1,2] for example, then the context.path result would look something like: [ [0,0], [0,1], [1,1], [1,2] ].  That means we will need some sort of method that will make the player move to the tile at context.path[0], then remove that element at 0, and if the context.path still has a length greater than 0, have your player go to the tile that is now at context.path[0].  We will go over this more in the next section.

4. Moving the Player to the Destination

In the last section, we made a call to “movePlayerToTile().”  Let’s define what that is:

movePlayerToTile : function(context, array) {
  var row = array[0],
  column = array[1];
  context.playerModel.set('destRow', row);
  context.playerModel.set('destColumn', column);
  context.playerModel.set('destX', context.tileMap[row][column].get('x'));
  context.playerModel.set('destY', context.tileMap[row][column].get('y'));
  context.model.set('movePlayer', true);
 }

Remember how our main.js looked like?  It had the ticker and checked if the “movePlayer” property was set to true.  If so, then it would call “movePlayer().”

var tick = function(dt, paused) {
  mapView.stage.update();
  if (mapModel.get('movePlayer') === true) {
    mapView.movePlayer(mapView);
  }
}

And since the “movePlayer” property is now set to true, it will cause this “movePlayer()” method to run in the ticker:

movePlayer : function(context) {
  var playerX = context.player.x,
      playerY = context.player.y,
      destX = context.playerModel.get('destX'),
      destY = context.playerModel.get('destY'),
      removedElement;
  if (playerX < destX) {
    context.player.x += 0.5;
  } else if (playerX > destX) {
    context.player.x -= 0.5;
  } else {
    context.player.x = destX;
  }
  if (playerY < destY) {
    context.player.y += 0.5;
  } else if (playerY > destY) {
    context.player.y -= 0.5;
  } else {
    context.player.y = destY;
  }
  if ( (playerX === destX) && (playerY === destY) ) {
    context.model.set('movePlayer', false);
    context.playerModel.set('x', destX);
    context.playerModel.set('y', destY);
 
    if (context.path.length > 0) {
      context.path.splice(0,1);
      if (context.path.length > 0) {
        context.movePlayerToTile(context, context.path[0]);
      } else {
        context.model.set('movePlayer', false);
      }
    } else {
      context.model.set('movePlayer', false);
    }
 
  }
  context.stage.update();
}

And watch your player go from tile to tile by the click of your mouse!

For further reading and more information about pathfinding, check out this awesome link: http://theory.stanford.edu/~amitp/GameProgramming/


Creating an Isometric World with EaselJS

Games have many different views – top-down, side-scrolling, 3D, isometric, etc etc.  Today, I will be writing about how to set up an isometric view using Javascript and the EaselJS library.  Isometric view is a 2D representation of 3D.  In 3D, objects have vanishing points while they move, and their dimensions and scales change.  In isometric view, this does not happen; objects do not have vanishing points and lines remain parallel and proportionate to one another.

1. Creating an isometric tile

To create an isometric tile, follow these simple steps:

  1. Draw a square
  2. Rotate the square by 45 degrees
  3. Set the square’s height to 50%

That’s it!  An isometric tile’s height is half of its width.

creating-isometric-tile

2. Adding the tile to the world

An isometric view basically contains rows and columns of tiles.  This means having two for loops, one in the other.  In EaselJS, for a 4 x 4 grid with tiles that have 130-pixel width and 65-pixel height, you’ll end up with something like this:

for (i = 0; i < 4; i++) {
  for (j = 0; j < 4; j++) {
    bmp = new createjs.BitmapAnimation(img);
    bmp.x = (j-i) * x;
    bmp.y = (i+j) * y;
    bmp.regX = 65;
    bmp.regY = 32.5;
    context.stage.addChild(bmp);
  }
}

The 4’s in the for loop come from the number of rows and columns in the grid (4 x 4).  I used BitmapAnimation in case we want to make an assortment of tiles (explained in Section 5).  regX and regY is for the registration point of the tile; we want to make it at the center of the tile in order for them to be placed in a grid-like pattern.  The tile is 130×65, so half of 130 is 65, and half of 65 is 32.5.  This will make the registration point at its center.

isometric-view

You’ll notice that the tiles have a “side view” (the brown part).  I’ve just added that for cosmetic purposes to give the illusion that we can see the ground underneath the grass.

3. Creating an assortment of isometric tiles

Let’s say we want many different types of tiles – grass, water, gravel, sand, etc etc.  Go wild with your tiles!  But for the purpose of this blog post, I’ll keep it simple and have a grass tile, a water tile, and tiles that have a bit of both.  As for the numbers underneath each tile, I’ll explain those in the next sections.

assorted-isometric-tiles

4. Creating an external tile map data file

Ideally, we’d want the tile information in an external file.  This will make it easier when our world, or tile map, is huge and has an assortment of tiles.  I’ve created a JSON file to represent the rows of the tile map, and which frame is in each tile.  The rows are the keys and the list of each tiles’ frames in each row are the values:

{
  “main”: {
    “0”: [“1″,”5″,”5″,”2”],
    “1”: [“8″,”0″,”0″,”6”],
    “2”: [“8″,”0″,”9″,”6”],
    “3”: [“4″,”7″,”7″,”3”]
  }
}

So if you map it with the image in Section 3, you can expect the tile at (0,0) to have water at its northern corner and grass in the rest of its tile (frame 1 in the Section 3 image).  We also expect to see the water tile in (2,2), which is frame 9 of the image.  We’ll see full grass tiles in (1,1), (1,2), and (2,1), which is frame 0 of the image.  Hopefully, you get the picture!

5. Setting up the world using the tile map data

So let’s revise the code a bit from Section 2 to use our tile map data.  But first, we have to load the external tile map data file.  Let’s assume we’ve called the file “game-map.json” and it’s in the “data” directory.  And remember our function scoping in Javascript, hence the this to that reference!

var that = this;
$.getJSON('data/game-map.json', function(data) {
  that.mapData = data['main'];
  that.createTileMap(img, that.mapData);
});

And let’s put it together with our previous code.  Note the “bmp.currentFrame” line of code:

createTileMap : function(img, data) {
  for (i = 0; i < 4; i++) {
    for (j = 0; j < 4; j++) {
      bmp = new createjs.BitmapAnimation(img);
      bmp.x = (j-i) * x;
      bmp.y = (i+j) * y;
      bmp.regX = 65;
      bmp.regY = 32.5;
      bmp.currentFrame = data[i][j];
      context.stage.addChild(bmp);
    }
  }
}

And the results, just as we’ve predicted!

Screen Shot 2013-02-24 at 10.38.42 PM

EaselJS (with Backbone.js)

In my last post, I wrote about gameQuery; since then, I have tried out EaselJS, a similar Javascript library. Unlike gameQuery, however, EaselJS uses HTML5 canvas; gameQuery uses DOM manipulation.

I tried building the same game from my last post with EaselJS and Backbone.js. To my surprise, working with EaselJS was somewhat similar to coding in ActionScript 3 – there was a stage (the root level container for a display list) and there was”addChild(),” which is used to add display objects to containers. In fact, many of the methods in Container reminded me of AS3’s DisplayObjectContainer, so coming from a Flash background, I found EaselJS’s concept of a display list and working with it easy to grasp.

Left: EaselJS in a Backbone.js View; Right: gameQuery in a Backbone.js View

Left: EaselJS in a Backbone.js View; Right: gameQuery in a Backbone.js View

In the above code screenshot, it took less than half as many lines in gameQuery to load images.  However, from a readability perspective, I could understand what’s going on in the EaselJS code without having to look it up in the documentation.  Also, I like the flexibility of EaselJS in that I have the ability to add event listeners for when the images have been loaded.  gameQuery was more about setting images and their properties to certain DOM nodes.  Furthermore, I would rather go with EaselJS, since it is still being actively updated and maintained.  And, last but not least, EaselJS is part of a suite of Javascript libraries – CreateJS – which has libraries for tweens, sounds, and preloaders.  This means easy integration with these other libraries.  There is even a way to integrate EaselJS with Box 2D for physics, which I have yet to explore.

So in my quest to find a Javascript library for graphics and animation, I will be going with EaselJS.  I’ve quickly looked at Crafty, but its documentation seemed a bit lacking, and its features seemed comparable with EaselJS… although it isn’t in a suite of other library goodies like EaselJS.  🙂

Check out my source code for EaselJS with Backbone.js here.